
How to build scalable AI agents with A2A and LavinMQ: A step-by-step guide
Want to run AI agents in a reliable way? This guide shows you, step by step, how to build scalable AI agents using the Agent-to-Agent (A2A) protocol together with LavinMQ. You will learn how to take an early prototype and turn it into a system that can handle real workloads - long-running tasks, retries, and multiple workers.
Artificial intelligence (AI) agents are doing more than generating one-off responses. They plan, retrieve data, call APIs, use tools, reason over documents, and execute multi-step workflows - and yet we’re still just experiencing the beginning of the techniques capacity. However, as soon as you attempt to run these agents in a real production environment, you discover that AI agents don’t behave like simple Hyper Text Transfer Protocol (HTTP) handlers. Those are great because they are fast, lightweight, and easy to operate, but they assume a short-lived interaction model that doesn’t fit how real agents work.
Instead, they:
- are more time consuming as they perform multi-step reasoning.
- wait, since large language model (LLM) calls can last several seconds.
- think, since they evaluate options and plan actions across multiple tool calls.
- retry, since external APIs rate-limit, fail occasionally, or return incomplete data.
- gather information from different search engines, and external or internal databases before producing an answer.
They often do all of this for far longer than the few seconds for which HTTP was originally designed.
Therefore, long-running AI workloads within a request-response cycle, may result in timeouts, blocked servers, and poor scalability. HTTP is a stateless request - response protocol designed for short-lived interactions (See RFC 9110 - HTTP Semantics, Section 1.)
Conscious architectural choices with LavinMQ
To support real AI agents, we need an architecture designed for asynchronous work, retries, progress updates, and distributed execution. The combination of the A2A protocol, the A2A-AMQP adapter, and LavinMQ provides exactly that foundation.
Using this stack, we can accept requests over HTTP, enqueue tasks to an AMQP-backed queue, distribute work across multiple workers, stream progress updates via event streams, and return results to clients via Server-Sent Events (SSE). It turns agent execution from a blocking operation into a scalable distributed workflow.
In the next sections, you will see this architecture in practice through a step-by-step walkthrough. You will clone a working example repository, connect it to a LavinMQ instance, run the server and worker processes, and send real agent requests through the system.

This pattern mirrors the same architectural principles used in large-scale backend systems for years: durable queues, background workers, event logs, and scalable fan-out processing. AI agents simply bring new computational workloads to this proven foundation.
Let’s build the system from scratch.
Part 1 - Using managed LavinMQ on CloudAMQP
We begin with CloudAMQP because it is the fastest way to get a production-grade AMQP backbone without installing anything locally.
Step 1 - clone the repository
Although it’s possible to implement everything manually, the simplest way to get started is to clone the official repository, which contains a complete example with a server, a worker, and a minimal agent.
git clone https://github.com/cloudamqp/a2a-amqp.git
cd a2a-amqp # Enter the directory
Step 2 - Install Bun (if you don’t have it)
The project uses Bun, a fast JavaScript runtime.
curl -fsSL https://bun.sh/install | bash # Install Bun
source ~/.bashrc # Reload your terminal so Bun becomes available
bun --version # Check that Bun is installed
Step 3 - Install dependencies
bun install # Install all project dependencies. This installs the packages
           # required for the server, worker, and the A2A-AMQP adapter.
bun run build # Compile the TypeScript project. This step produces
              # compiled JavaScript artifacts inside the build directory.
Step 4- Connect to managed LavinMQ
Log in to CloudAMQP.com. If you don’t have an account, you can create one for free. CloudAMQP offers free LavinMQ plan, which is ideal for testing.
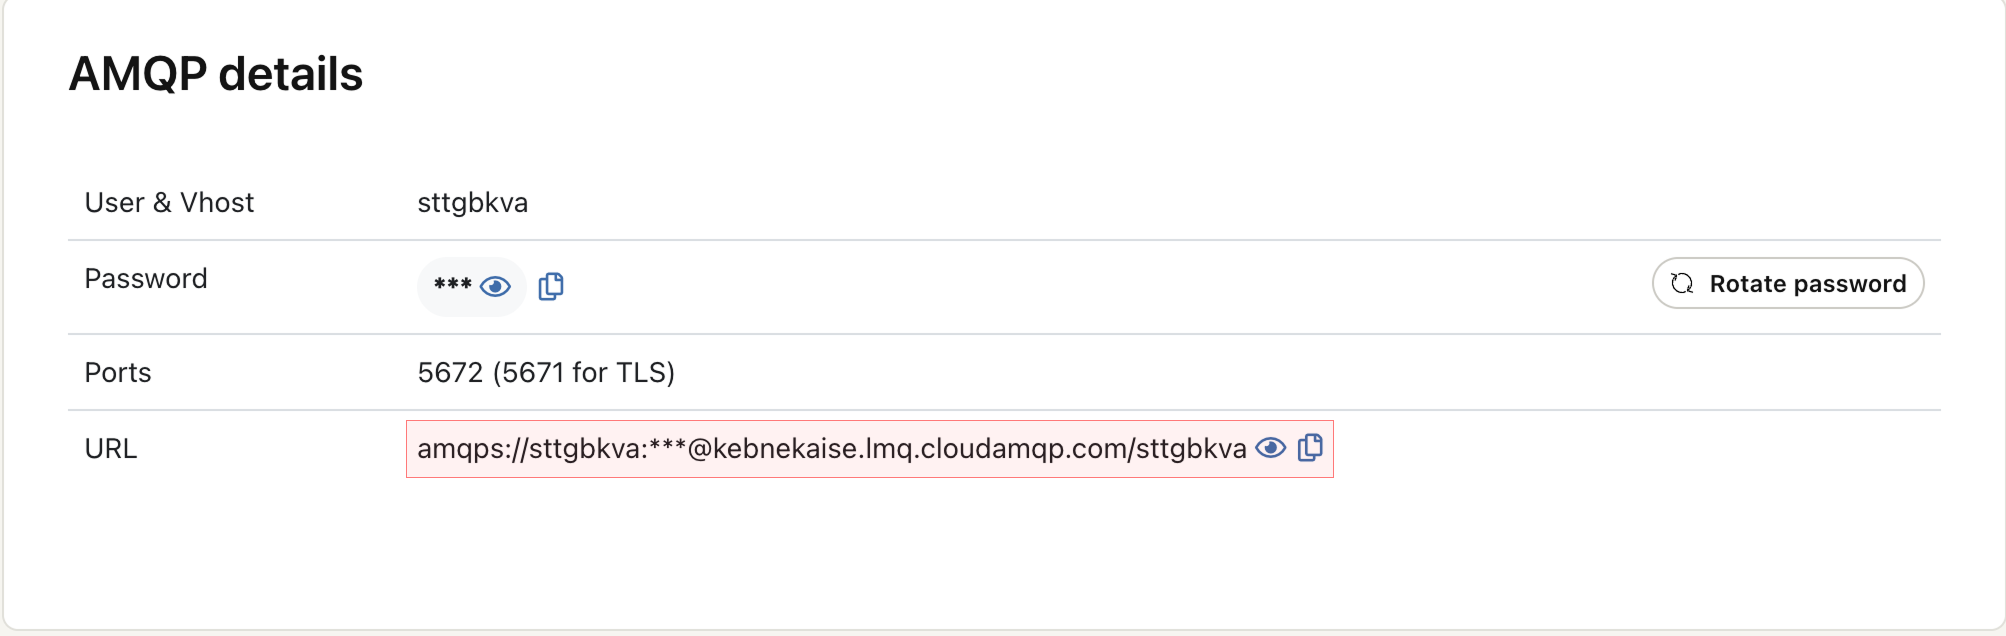
Create a new LavinMQ instance using either the web dashboard or the CloudAMQP CLI. Once the instance is ready, open it and go to the AMQP Details page. There you will find your AMQPS connection URL (marked with a red color in the screenshots below).
This is the URL your server and workers will use to communicate with LavinMQ. Before running anything, your LavinMQ instance will show 0 connections and no queues or streams, which is expected because nothing is connected yet.
Now, instead of editing the example source code, we simply provide this URL through an environment variable:
# Store your CloudAMQP connection URL in an environment variable
export AMQP_URL="amqps://USER:PASSWORD@HOST/vhost"
Every component (server, worker, agents) will automatically read this environment variable.
Step 5 - Start the A2A HTTP server
Run this from the a2a-amqp directory
bun run server # terminal 1
This server:
- Accepts A2A HTTP requests
- Enqueues tasks into your CloudAMQP LavinMQ queue
- Exposes an SSE endpoint for streaming task progress Leave this running.
Step 6 - Start the worker (where the agent lives)
Open a second terminal in the same directory, and run this:
bun run worker # terminal 2
This worker process:
- Connects to CloudAMQP
- Consumes tasks from the work queue
- Executes your agent logic inside
GreetingExecutor - Publishes progress + final results to the event stream
To scale workers horizontally, start multiple worker processes - one per terminal window:
WORKER_ID=worker-1 bun run worker # terminal 3
WORKER_ID=worker-2 bun run worker # terminal 4
                 .
                 .
                 .
WORKER_ID=worker-n bun run worker # terminal n
Each worker will automatically pick tasks from the shared queue.
Step 7 — Send your first agent request
Use curl to talk to your A2A HTTP server:
# server is listening on port 3000
curl -X POST http://localhost:3000/ \
  -H "Content-Type: application/json" \
  -d '{
    "jsonrpc": "2.0",
    "id": "1",
    "method": "message/send",
    "params": {
      "message": {
        "kind": "message",
        "role": "user",
        "messageId": "msg-1",
        "contextId": "ctx-1",
        "parts": [
          { "kind": "text", "text": "Hi, my name is Sara" }
        ]
      }
    }
  }'
You will now see, the LavinMQ dashboard updating with the number of connections, queues, and channels.
You now have a fully functioning, cloud-hosted, scalable agent pipeline.
Minimal agent example (Inside the worker)
Here’s the example GreetingExecutor used in the repo:
export class GreetingExecutor {
  async execute(input: { name: string }, ctx: AgentContext) {
    ctx.publish({ status: "Thinking..." });

    // Simulate some reasoning delay
    await new Promise((resolve) => setTimeout(resolve, 1000));

    ctx.publish({ status: "Generating response..." });

    return {
      message: `Hello ${input.name}, this response was processed by an AI agent!`
    };
  }
}
Everything complex (retries, queues, durability, streaming, scaling) is handled by A2A protocol, A2A-AMQP adapter, and LavinMQ. All you change is the execute() method.
Part 2 - Running the same architecture locally
If you want to repeat the entire workflow locally without CloudAMQP, you only need to run LavinMQ in Docker and switch one environment variable.
Step 1 - Start LavinMQ locally
# Start a local LavinMQ instance
docker run -d --name lavinmq \
  -p 5672:5672 \
  -p 15672:15672 \
  cloudamqp/lavinmq:latest
Check the UI at: http://localhost:15672, and observe queues, connections, and streams as they come to life.
Step 2 — Switch to local AMQP URL
# Use the local AMQP endpoint instead of CloudAMQP
export AMQP_URL="amqp://guest:guest@localhost:5672"
Step 3 — Restart the server and worker
bun run server # Run server from the a2a-amqp directory
bun run worker # Run worker in another terminal from the same directory
Everything else works exactly the same: the same agent, the same worker, the same example, the same structure. What makes this architecture so powerful is that you never modify the infrastructure as your agents grow more complex. All logic stays inside the execute() method of your agent class.
Summary
AI agents often perform long, multi-step operations that don’t fit inside traditional HTTP request-response cycles. This blog walks through how to build a scalable architecture using the A2A protocol, LavinMQ, and the A2A-AMQP adapter. By combining durable queues, background workers, and event streams, you can run complex agents reliably without timeouts.
If you want to try it out, checkout the cloudamqp/a2a-amqp GitHub repo.
Hailay Gebremeskel